2025-08-12
Choosing the right drill can be a daunting task, especially with the wide variety available on the market. One of the most significant distinctions you'll encounter is between brushed and brushless drills. Both serve the same fundamental purpose—drilling holes and driving screws—but they achieve this in fundamentally different ways, which impacts their performance, efficiency, and cost. This article will break down the key differences between these two types of drills to help you decide which one is the best fit for your needs.
A brushed drill uses a traditional motor design that's been around for decades. Its key components are an armature (a rotor with wire coils), a commutator, carbon brushes, and permanent magnets.
The motor works by passing electrical current from the battery through the carbon brushes to the commutator and then to the wire coils of the armature. This creates a temporary magnetic field in the armature, which interacts with the permanent magnets in the motor housing, causing the armature to spin. As the armature rotates, the brushes maintain contact with the commutator, continuously reversing the current's direction to keep the motor spinning.
Pros and Cons of Brushed Drills
Pros: Generally, brushed drills are more affordable and have a simpler design, making them a great choice for budget-conscious users or those who only need a drill for occasional, light-duty tasks.
Cons: The constant friction between the brushes and the commutator generates heat, which leads to lower efficiency and a shorter lifespan. The brushes also wear down over time and need to be replaced, increasing maintenance requirements.
A brushless drill represents a more modern and advanced motor technology. It features a stator (the stationary part of the motor with wire coils), a rotor with permanent magnets, and an electronic controller.
Unlike a brushed motor, a brushless motor doesn't use brushes or a commutator. Instead, an integrated electronic controller energizes the stator's wire coils in a specific sequence. This creates a rotating magnetic field that pulls the permanent magnets on the rotor along with it, causing the motor to spin. The controller precisely controls the timing and power of the electrical current, resulting in a more efficient and powerful motor.
Pros and Cons of Brushless Drills
Pros: Brushless drills are significantly more efficient, have a longer lifespan, and require less maintenance because there's no physical contact between the components. This also translates to more power and torque for the same size and weight, as well as longer battery life.
Cons: The primary downside is the higher initial cost due to the more complex technology and the electronic controller. However, for serious DIYers and professionals, the long-term benefits often outweigh this cost.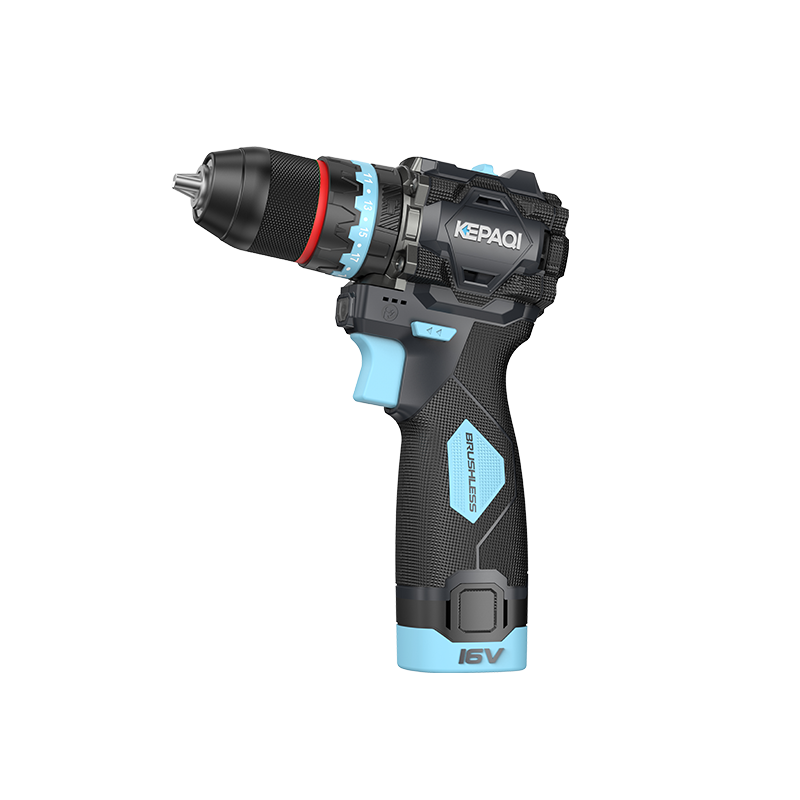
The choice between a brushed and brushless drill boils down to several key performance factors. Understanding these differences will help you align the tool's capabilities with the demands of your projects.
Brushless drills are significantly more efficient than their brushed counterparts. A brushed motor loses a substantial amount of energy to friction and heat from the constant contact between the brushes and the commutator. A brushless motor, by contrast, uses a solid-state electronic controller to manage the magnetic fields, eliminating this friction. This means more of the battery's energy is converted into rotational force, resulting in longer run times and cooler operation.
While brushed drills can deliver a decent amount of power, brushless drills generally have the edge. The electronic controller in a brushless drill can dynamically adjust power output based on the load. This allows the tool to maintain speed under heavy loads and deliver more torque when needed, which is crucial for drilling through tough materials or driving large fasteners. Modern cordless drills have become increasingly powerful, with high-voltage batteries and advanced motor designs that provide the kind of torque once reserved for corded tools.
Maintenance is one of the most significant differentiators. Brushed drills require periodic maintenance, as the carbon brushes will eventually wear down and need to be replaced. This can be a simple task, but it is an extra step that adds to the long-term cost and downtime of the tool. Brushless drills, with no brushes to wear out, are virtually maintenance-free. Their lifespan is primarily limited by the longevity of the electronic components and the battery itself.
Due to the absence of wearing parts, a brushless drill motor has a much longer potential lifespan. The brushes in a brushed motor are a consumable part, and their wear limits the motor's life. While a brushed motor can last for years with proper care and brush replacement, a brushless motor is built for long-term, heavy-duty use.
This is often the most critical factor for many buyers. Brushed drills are typically more affordable, making them an excellent entry point for DIYers or anyone on a tight budget. The advanced technology in brushless drills, particularly the electronic controller, makes their initial cost higher. However, for those who use their tools frequently, the long-term savings from reduced maintenance and longer tool life can make a brushless drill a more economical choice over time.
|
Feature |
Brushed Drills |
Brushless Drills |
|
Motor Components |
Armature, commutator, carbon brushes, magnets |
Stator, rotor with magnets, electronic controller |
|
How it Works |
Current passes through brushes to commutator to spin armature |
Electronic controller energizes stator coils to spin magnet-laden rotor |
|
Efficiency |
Lower (energy lost to friction and heat) |
Higher (minimal energy loss) |
|
Power & Torque |
Good for basic tasks |
Superior; can adjust power dynamically |
|
Maintenance |
Requires periodic brush replacement |
Virtually maintenance-free |
|
Lifespan |
Shorter (brushes wear out) |
Longer (no wearing parts in motor) |
|
Cost |
More affordable |
Higher initial cost |
|
Best For |
Occasional DIY use, light-duty tasks, budget-conscious users |
Frequent use, demanding applications, professionals |
When choosing a power tool, a hobbyist's RC car, or even an appliance, one of the most significant factors to consider is the type of motor it uses: brushed or brushless. While both perform the same fundamental task of converting electrical energy into mechanical energy, they do so in different ways, leading to distinct advantages and disadvantages. This document will explore the design, performance, and practical applications of each motor type to help you determine which one is right for your needs.
Brushed DC (direct current) motors are a traditional and widely used motor type. Their simple design consists of a rotor (the part that spins) with wire coils and a stator (the stationary part) with permanent magnets. The key components that give them their name are the carbon brushes and the commutator. The brushes make physical contact with the commutator on the rotor, which reverses the polarity of the current in the coils. This constant reversal of magnetic fields causes the rotor to spin.
Brushless DC motors, as their name suggests, operate without brushes. In a brushless motor, the roles are reversed: the permanent magnets are on the rotor, and the wire coils are on the stator. The magnetic fields that cause the rotor to spin are controlled by an electronic circuit board (often called an Electronic Speed Controller, or ESC) that constantly switches the current to the coils in a precisely timed sequence. This eliminates the need for physical contact between components to switch polarity.
|
Parameter |
Brushed Motors |
Brushless Motors |
|
Construction |
Simpler design with a commutator and carbon brushes that wear over time. |
More complex design with an integrated electronic controller; no physical contact between moving parts. |
|
Efficiency |
Generally less efficient, typically 75-80%. Energy is lost as heat from friction between brushes and the commutator. |
Highly efficient, often 85-90% or more. The lack of friction and improved control over magnetic fields results in less wasted energy. |
|
Durability/Lifespan |
Lifespan is limited by the brushes, which eventually wear down and need replacement. |
Longer lifespan due to the absence of physical contact components that wear out. |
|
Maintenance |
Requires periodic maintenance to clean dust from the carbon brushes and replace them as they wear down. |
Essentially maintenance-free. The sealed design protects the internal components. |
|
Cost |
Less expensive to manufacture and purchase. |
More expensive due to the more complex electronic controller required for operation. |
|
Speed/Power |
Lower torque at lower speeds. Power output is less consistent. |
Higher torque at all speeds and more consistent, higher power output. The electronic control allows for precise speed adjustments. |
|
Noise |
Can be noisy due to the friction of the brushes against the commutator. |
Much quieter because there is no mechanical friction. |
|
Heat Generation |
Generates more heat due to internal friction, which can limit performance and longevity. |
Runs cooler due to higher efficiency and no friction from brushes. |
Brushed and brushless motors can look similar from the outside, but they have distinct physical characteristics and operational behaviors that can help you tell them apart. Knowing these differences is useful whether you're working with power tools, hobby electronics, or other devices. This guide will walk you through the most reliable ways to identify each motor type.
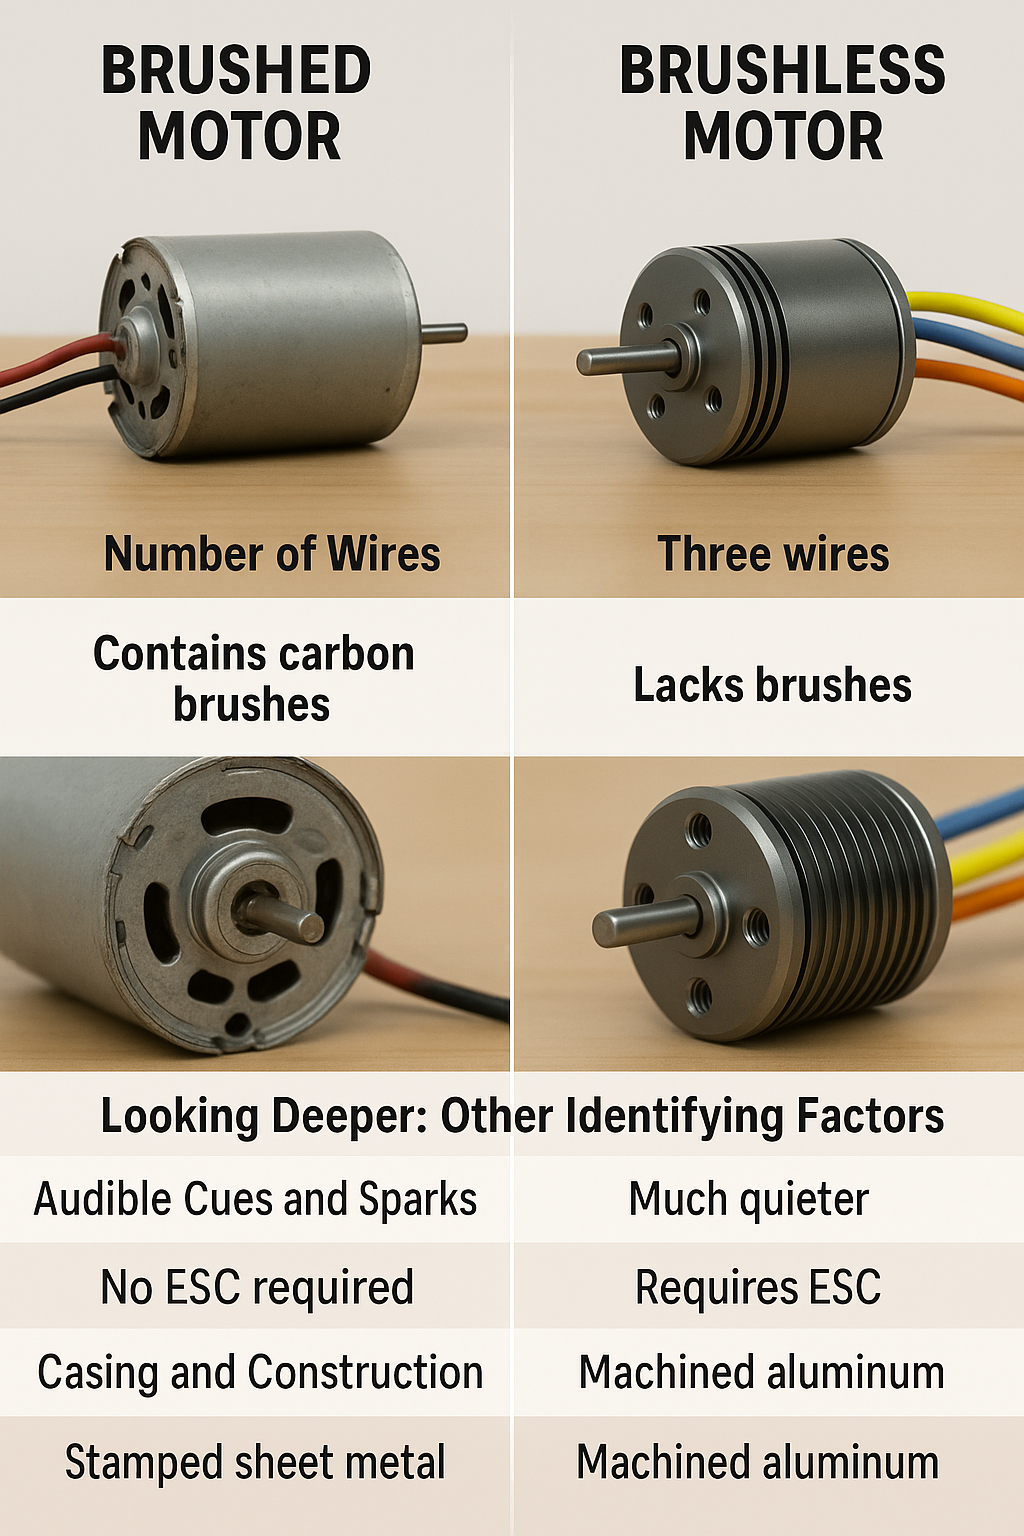
The simplest way to identify a motor is often by looking at its most prominent external features: the number of wires and the casing.
Number of Wires: This is often the most immediate giveaway.
Brushed motors typically have two wires (a positive and a negative) connected directly to the power source.
Brushless motors almost always have three or more wires coming from the motor itself. These three wires are the power phases, and additional wires may be present for sensors that help the electronic controller function.
Presence of Brushes: If you can see into the motor or if it has removable end caps, a quick inspection can reveal its type.
Brushed motors contain carbon "brushes" that make physical contact with a spinning component called the commutator. These brushes are a key part of the motor's design and will be visible near the motor shaft.
Brushless motors lack these physical brushes and commutators entirely. The absence of these parts is what gives them their name.
Beyond the basics, you can use other signs to confirm your identification, especially when the motor is in operation.
Audible Cues and Sparks:
Brushed motors often produce a distinct humming or buzzing sound due to the friction of the brushes on the commutator. During operation, you might even see small sparks coming from this contact point.
Brushless motors are much quieter because there are no physical components rubbing against each other.
Electronic Controller:
Brushed motors do not require a separate electronic controller to operate; they can be run by simply applying a DC voltage.
Brushless motors cannot function without a separate Electronic Speed Controller (ESC). This external controller is what directs the power to the motor's internal coils, and its presence is a clear sign that you are dealing with a brushless motor.
Casing and Construction:
Brushed motors often have a more utilitarian, stamped sheet metal casing.
Brushless motors are frequently housed in more robust, machined aluminum casings, sometimes with cooling fins to help dissipate heat.
|
Parameter |
Brushed Motors |
Brushless Motors |
|
Wire Count |
Two wires (power and ground) |
Three or more wires (three for power phases, plus optional sensor wires) |
|
Visible Components |
Carbon brushes and commutator are present and may be visible. |
No brushes or commutator; internal components are typically sealed. |
|
Audible Cues |
Often loud due to brush friction; may spark. |
Runs much quieter, no sparking. |
|
Required Electronics |
No external electronic controller needed for basic operation. |
Requires an Electronic Speed Controller (ESC) to function. |
|
Casing Appearance |
Typically stamped sheet metal. |
Often has a more refined, machined aluminum casing. |
|
Heat Generation |
Tends to run hotter due to internal friction. |
Runs cooler due to higher efficiency and lack of friction. |
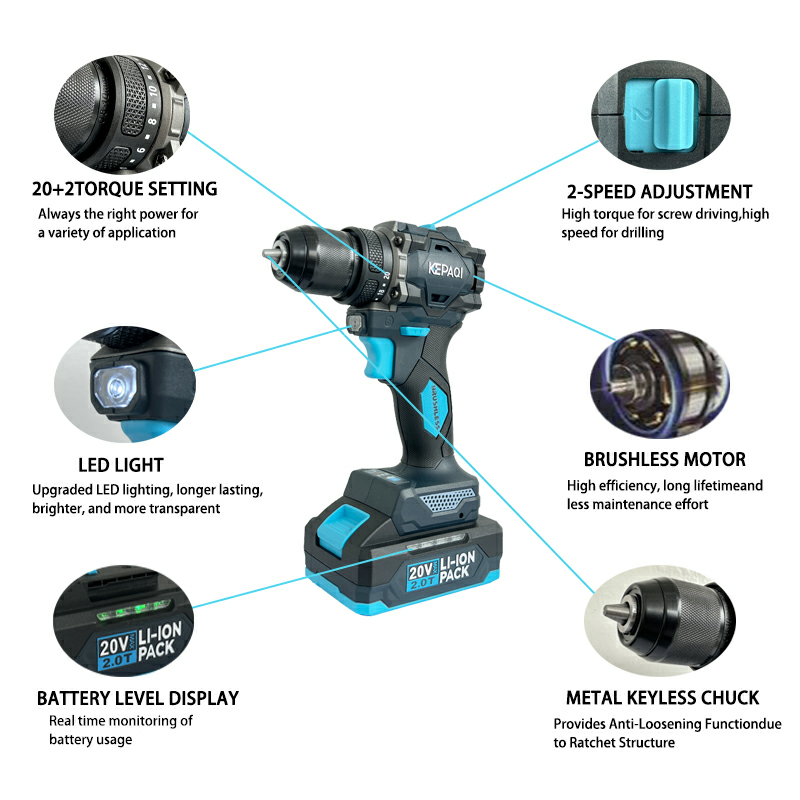
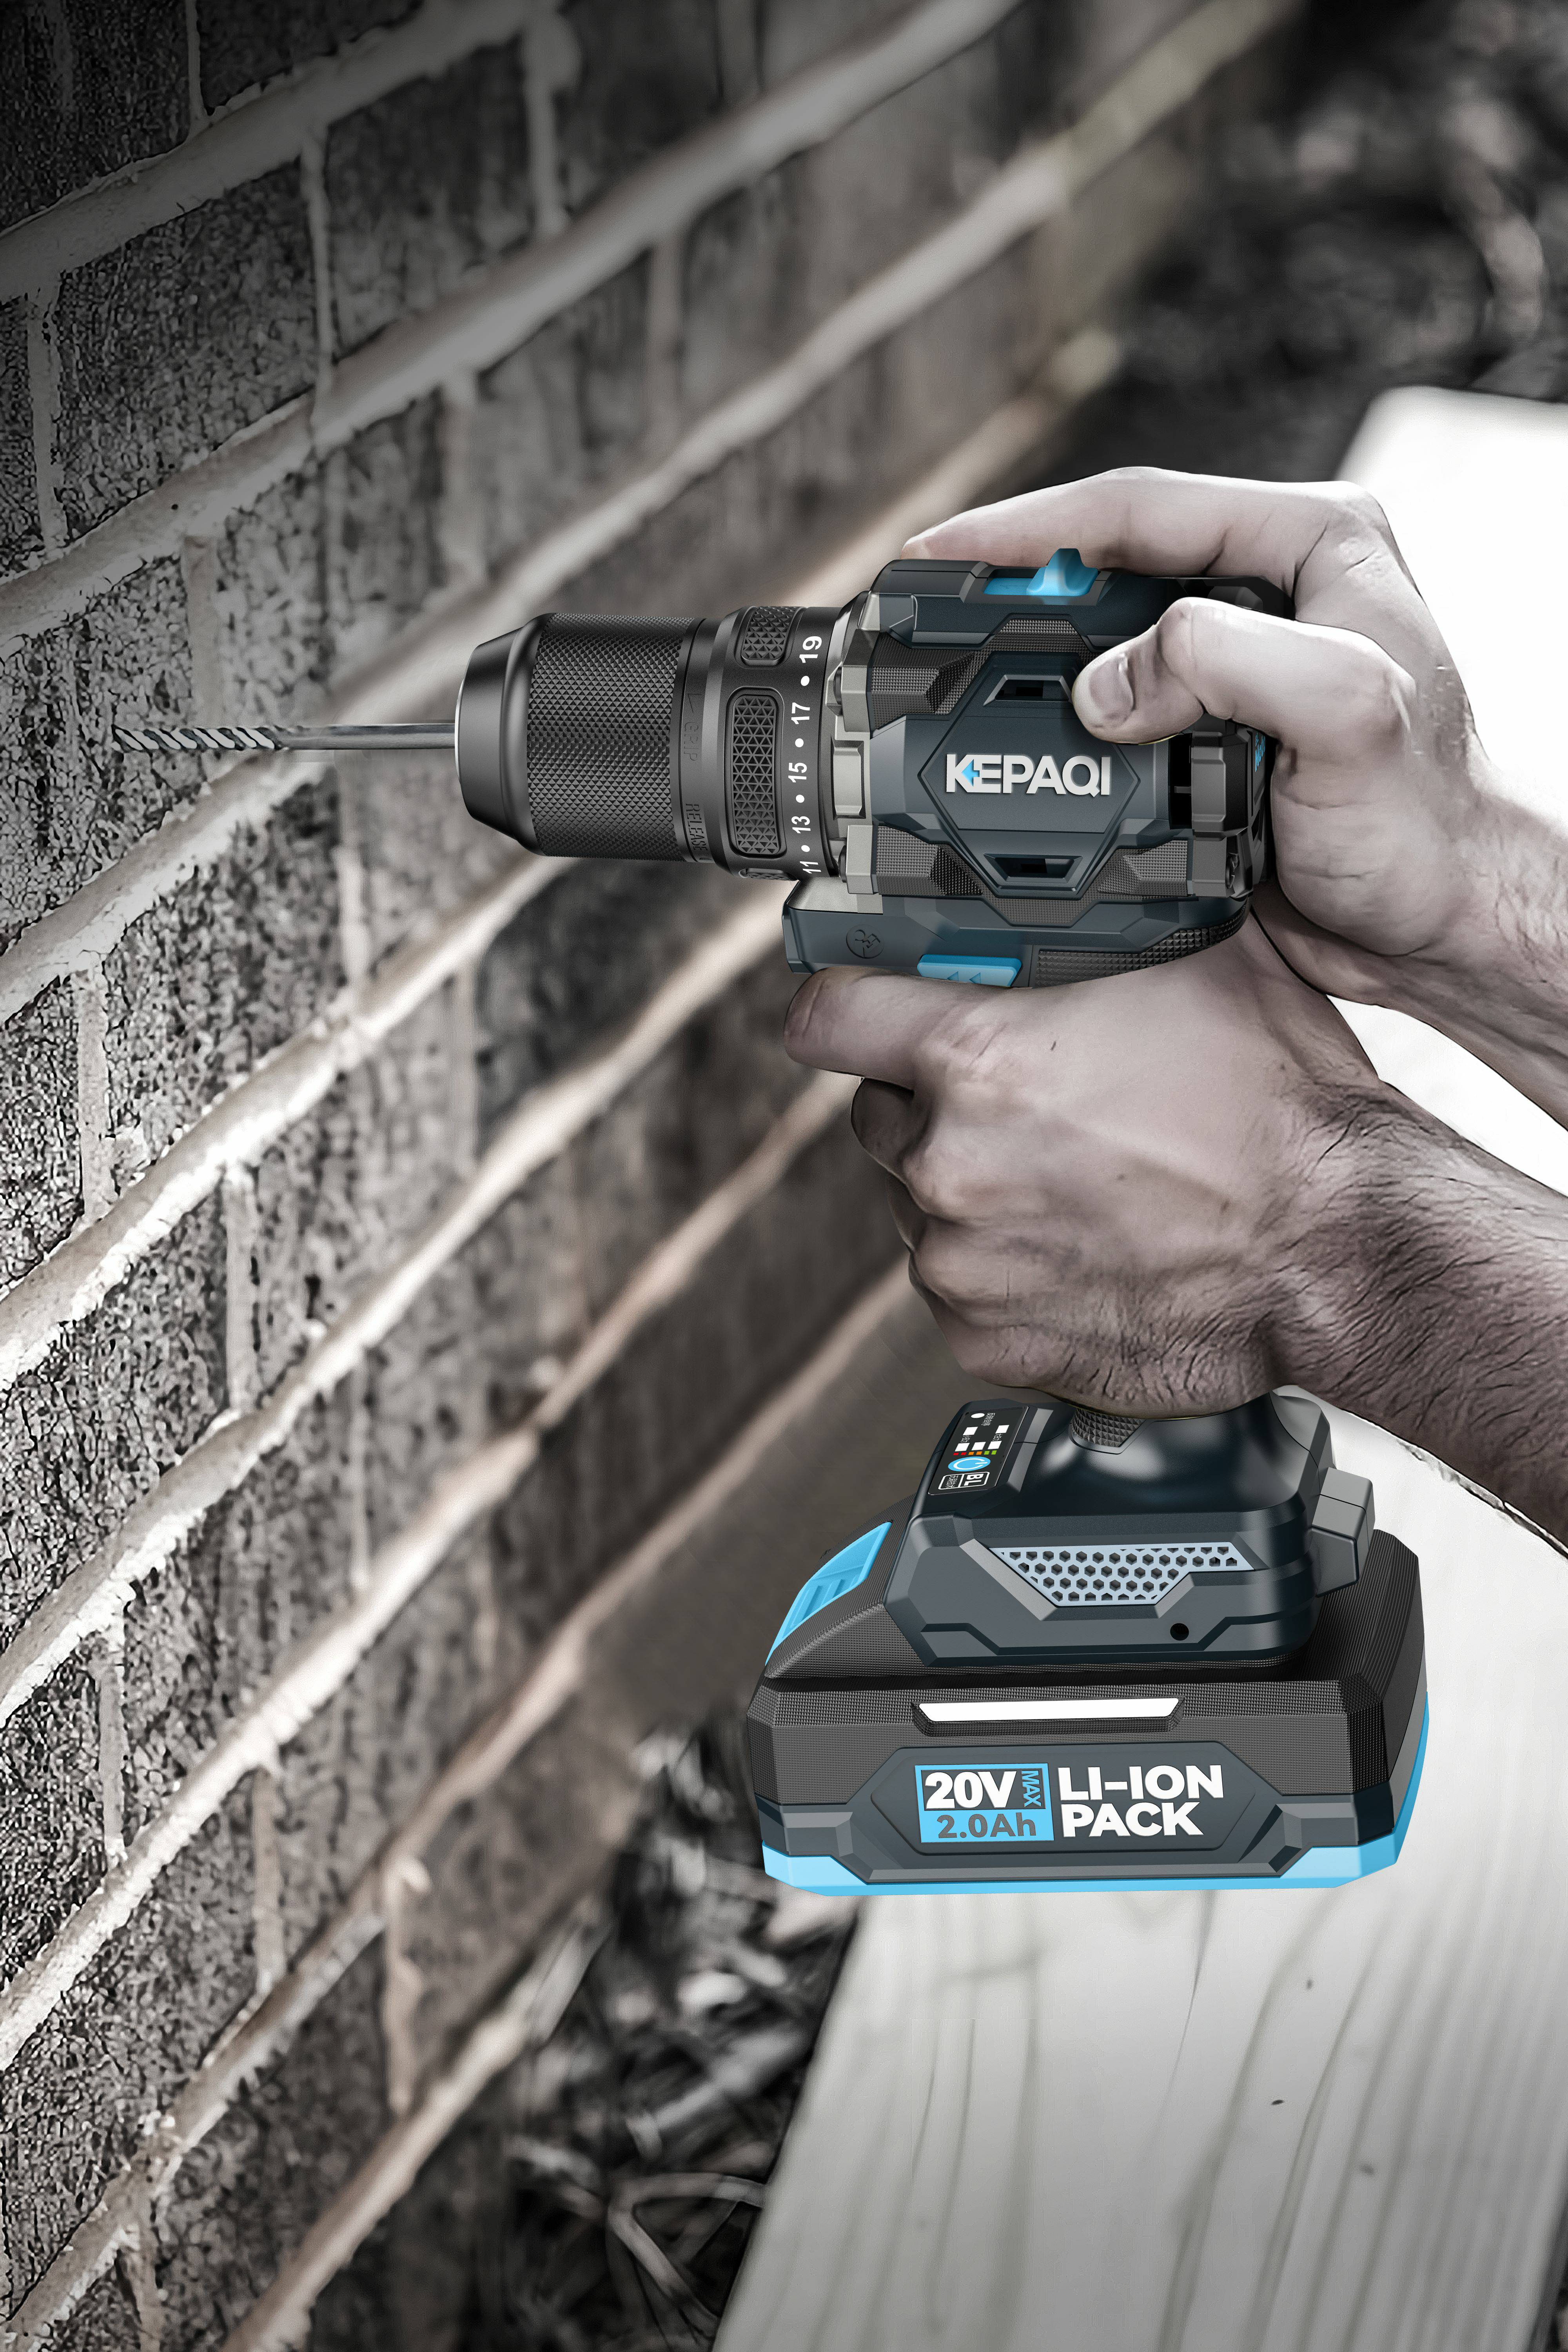
A cordless drill is an essential tool for any DIY project, from hanging a picture to assembling furniture. It might seem intimidating at first, but with a little practice and knowledge of its key features, you'll be using it like a pro in no time. This guide will walk you through the basics, focusing on safety and proper technique.
Understanding the different parts of a cordless drill will help you use it safely and effectively.
|
Part |
Function |
|
Chuck |
The front part of the drill that holds the drill bit or screwdriver bit in place. You twist it to loosen or tighten it. |
|
Clutch / Torque Collar |
A numbered ring behind the chuck that controls the amount of force (torque) the drill applies. Lower numbers are for softer materials and smaller screws, while higher numbers and the "drill" setting are for harder materials. |
|
Speed Selector |
A switch on top of the drill body that changes the gear. The "1" setting is low speed with high torque (for driving screws), and the "2" setting is high speed with lower torque (for drilling holes). |
|
Forward/Reverse Switch |
A small button or lever near the trigger that changes the direction of the bit's rotation. Use Forward (clockwise) for drilling and tightening screws, and Reverse (counter-clockwise) for removing them. |
|
Trigger |
The main button you squeeze to make the drill work. It's a variable-speed trigger, which means the harder you press, the faster the drill spins. |
Safety First: A Beginner's Checklist
Safety is the most important part of using any power tool. Always follow these precautions to protect yourself and your project.
Wear Eye Protection: Always wear safety glasses to protect your eyes from dust, debris, and splintering wood.
Secure Your Workpiece: Never hold the material you are drilling with your hand. Use clamps or a vise to secure your project to a stable work surface.
Choose the Right Bit: Make sure you are using the correct bit for the job and for the material you are drilling. Using a wood bit on metal, for example, can damage the bit and the material.
Remove the Battery: When changing a bit or making any adjustments to the drill, always remove the battery to prevent the drill from accidentally turning on.
Manage Your Attire: Avoid wearing loose clothing, jewelry, or anything that could get caught in the spinning parts of the drill. If you have long hair, be sure to tie it back.
Once you're familiar with the parts and safety tips, you're ready to drill your first hole!
Insert the Bit: With the battery removed, twist the chuck counter-clockwise to open the jaws. Insert your chosen drill bit, then twist the chuck clockwise to tighten it securely around the bit. You can hold the chuck and briefly squeeze the trigger to get a final, tight grip.
Set the Controls: Set the speed selector to the "drill" setting (usually marked with a drill icon) or to the high-speed "2" setting. Make sure the forward/reverse switch is in the Forward position.
Mark the Spot: Use a pencil or an awl to mark the exact spot where you want to drill. This small indentation will prevent the drill bit from "walking" or slipping when you start.
Drill the Hole: Place the tip of the drill bit on your mark. With a firm but gentle grip, slowly squeeze the trigger to start the drill. Apply steady, consistent pressure as you drill, keeping the drill as straight and level as possible. Let the drill do the work—don't force it.
Remove the Bit: Once the hole is drilled, pull the drill bit out while it's still spinning to clear out any debris.
If you are looking for cost-effective disposable solutions, check our latest collection.
Contact Info
+86-13801463308
+86-13862872268
Nantong,Jiangsu,China
 English
 русский
 Español


